giovedì 29 settembre 2011

BizTalk Server 2010 Documentation


Download the documentation for BizTalk Server 2010:


Overview
To get started with BizTalk Server 2010, download one or more of the following:

For updated and new Help content for BizTalk Server 2010, download one of the following:

  • If you don't have BizTalk Server 2010 installed, download BizTalkServer2010CHM.exe.
  • If you do have BizTalk Server 2010 installed and want to update the existing Help, download BizTalkServer2010HXS.exe. See the Instructions section for additional information.

System requirements

Supported Operating Systems: Windows 7, Windows Server 2008, Windows Server 2008 R2, Windows Vista
  • For CHM files: No special software required.
  • For DOCX files: Microsoft Word or Word Viewer.
  • For HTM files: Microsoft Internet Explorer or other HTM viewer.
  • For HXS files: Microsoft BizTalk Server 2010.

Instructions

  1. To start the download, click the Download button next to the desired file.
  2. Do one of the following:
    • To start the installation immediately, click Open.
    • To copy the download to your computer for installation at a later time, click Save.
    • To cancel the installation, click Cancel.
If you are unable to view the CHM file when you click Open, try the download again but select Save and choose where you want to save the file. Then use one of the following methods to open the CHM:

Method 1
1. Double-click the .chm file.
2. In the Open File-Security Warning dialog box, click to clear the Always ask before opening this file check box.
3. Click Open.

Method 2
1. Right–click the .chm file, and then click Properties.
2. Click Unblock.
3. Double-click the .chm file to open the file.

For the HxS file (available in the BizTalkServer2010HXS.exe):
  1. Close the BizTalk Server documentation if you have it open.
  2. Download and run the BizTalkServer2010HXS.exe file.
  3. Click Unzip to unzip the documentation files to the C:\Program Files\Microsoft BizTalk Server 2010\Documentation folder. If you have installed BizTalk Server in a different folder, specify the installation location before you click Unzip. The contents of the download must be placed directly in the folder Microsoft BizTalk Server 2010\Documentation.
  4. Open BizTalk Server Help to view the updated documentation.

Book of Biztalk 2010


This are book:
Microsoft BizTalk 2010: Line of Business Systems Integration


venerdì 23 settembre 2011

FTP Receive Adapter fails to publish message if the receive pipeline processing time exceeds the server timeout value


Problem
Pipeline processing is performed on all messages that are received by the FTP Adapter. If the time taken to complete pipeline processing for messages received by the FTP connection times out then the message will not be published to the Messagebox and errors similar to the following may be generated in the Application log of the BizTalk server:
Event Type:Error
Event Source:BizTalk Server 2006
Event Category:BizTalk Server 2006 
Event ID:5719
Date:8/30/2006
Time:12:08:55 PM
User:N/A
Computer:BIZTALKSERVER
Description:
There was a failure executing the receive pipeline: "Microsoft.BizTalk.DefaultPipelines.PassThruReceive, Microsoft.BizTalk.DefaultPipelines, Version=3.0.1.0, Culture=neutral, PublicKeyToken=31bf3856ad364e35" Source: "Pipeline " Receive Port: "ReceivePort1" URI: "ftp://FTPSERVER:21/*.txt" Reason: Unable to receive the file "file.txt   " from the FTP server. 

and
Event Type:Warning
Event Source:BizTalk Server 2006
Event Category:BizTalk Server 2006 
Event ID:5740
Date:8/30/2006
Time:12:08:56 PM
User:N/A
Computer:BIZTALKSERVER
Description:
The adapter "FTP" raised an error message. Details "Unable to receive the file "file.txt   " from the FTP server. ".
Cause
The FTP Adapter attempts to delete the original copy of the message on the source FTP Server before it publishes the message to the Messagebox. If the connection has timed out then the FTP Adapter cannot delete the copy of the message on the source FTP Server.
Resolution
Use one of the following methods to mitigate this problem:
  1. Increase the connection timeout value. Set the Idle timeout value on the FTP server to be at least the amount of the time it takes to process the file.
  2. Use the Temporary Folder feature on the receive location. In this case, the FTP adapter copies the file to the temporary folder (typically local disk). The time to copy the file to local disk is less than the time it takes run the message through pipeline and persist it to the message box which effectively reduces the idle time.

Data may be duplicated or lost when you receive data in BizTalk Server 2006 by using the FTP adapter


Problem
Data is duplicated or lost when you receive data in BizTalk Server 2006 by using the FTP Adapter.
Cause
The BizTalk Server 2006 FTP adapter uses the FTP client protocol to poll the designated FTP server and retrieves data from the server "as is." The FTP adapter does not validate any data that it retrieves. The FTP adapter sends the retrieved document to the BizTalk Messaging Engine for processing and then it deletes the original document from the FTP server. If the FTP adapter retrieves a document from the FTP server that is still being written to by the host application, the retrieved document will be incomplete. If the FTP adapter retrieves an incomplete copy of the original document, data duplication or data loss may occur in the following scenarios:
  • If the original document is still being written to the FTP server by the host application, the FTP adapter cannot delete the document and will retrieve another copy of the document at the next polling interval that is configured for the receive location. This behavior causes document duplication to occur.
  • If the host application has finished writing the document to the FTP server, the document will be deleted. This behavior will cause data loss to occur.
Resolution
To work around this behavior, use one of the following methods:
  • Configure the host application to write to a temporary folder on the same hard disk as the public FTP folder and to periodically move the contents of the temporary folder to the FTP folder. The temporary folder should be on the same hard disk as the public FTP folder to make sure that the move operation is atomic. An atomic operation is an operation that is functionally indivisible. If you write data to the public FTP folder by using the BizTalk Server 2006 FTP adapter, you can do this by specifying a Temporary Folder property in the FTP Transport Properties dialog box when you configure a send port. If you specify a Temporary Folder property, make sure that this folder is on the same physical disk as the public FTP folder.
  • Configure the FTP receive location to operate within a service window when the host application is not writing data to the FTP server. You can specify the service window when you configure the receive location properties.

FIX: A file is not removed from an FTP location when you use BizTalk Server 2006 R2

Consider the following scenario in Microsoft BizTalk Server 2006 R2 or BizTalk Server 2009:
  • You retrieve a file from a subfolder at an FTP location by using an FTP receive location.
  • While BizTalk Server 2006 R2 is processing this file, the FTP connection times out.
  • After some time, BizTalk Server 2006 R2 opens a new FTP session, and then issues a DELE command.
In this scenario, BizTalk Server 2006 R2 cannot delete the received file from the subfolder at the FTP location. Additionally, the new FTP session is closed, and you can see log entries in the BizTalk Server 2006 R2 FTP log that resemble the following:


< 220 Microsoft FTP Service
> USER anonymous
< 331 Anonymous access allowed, send identity (e-mail name) as password.
> PASS xxxx
< 230 Anonymous user logged in.
> PWD
< 257 "/" is current directory.
> DELE file_name
< 550 file_name: The system cannot find the file specified.
> QUIT
< 221


When the BizTalk Server 2006 R2 or BizTalk Server 2009 next polls the FTP location, BizTalk Server 2006 R2 or BizTalk Server 2009 opens the FTP location and downloads the same file again.


CAUSE:
This problem occurs because BizTalk Server 2006 R2 or BizTalk Server 2009 does not issue a CWD command before it issues the DELE command. Therefore, instead of trying to delete the file from the configured subfolder, BizTalk Server 2006 R2 or BizTalk Server 2009 tries to delete the file from the FTP root directory.


HOTFIX:
The hotfix that resolves this problem is included in cumulative update package 1 for BizTalk Server 2006 R2 SP1. 

mercoledì 21 settembre 2011

How to Export an Application to an .Msi File (withou admin console)


  1. Open a command prompt as follows: Click Start, click Run, type cmd, and then click OK.

  2. Type the following command, substituting the appropriate values, as described in the following table:

    BTSTask ExportApp [/ApplicationName:value/Package:value [ResourceSpec:value [/Server:value

    [/Database:value]

    Example:

    BTSTask ExportApp /ApplicationName:MyApplication /Package:C:/MSI/MyApplication.msi /ResourceSpec:"C:\My Files\ResourceSpec.xml" /Server:MySQLServer /Database:BizTalkMgmtDb

    The artifacts you specified are exported into an .msi file in the location you specified.


    Parameter value:
    /ApplicationName: Name of the BizTalk application to export. If the application name is not specified, the default BizTalk application is used. If the name includes spaces, it must be enclosed with double quotation marks (").

    /Package:Path of the .msi file to be created, including its file name.

    /ResourceSpec: Path of the resource specification XML file, including file name. You can specify which artifacts to export by editing the resource specification XML file, which is created when you run the ListApp command with the ResourceSpec parameter, as described in ListApp Command. For more information, see "ListApp Command" in BizTalk Server 2006 R2 Help athttp://go.microsoft.com/fwlink/?LinkId=106823. You must manually edit this file to add the Internet Information Services (IIS) host server name for a virtual directory that you want to export if the Web server is on a remote computer.

    /Server: Name of the SQL Server instance hosting the BizTalk Management database, in the form ServerName\InstanceName,Port.
    Instance name is only required when the instance name is different from the server name. Port is only required when SQL Server uses a port number other than the default (1433).
    Examples:
    Server=MyServer
    Server=MyServer\MySQLServer,1533
    If not provided, the name of the SQL Server instance running on the local computer is used.

    /Database:Name of the BizTalk Management database. If not specified, the BizTalk Management database running in the local instance of SQL Server is used.

martedì 20 settembre 2011

How to Export Bindings for a BizTalk Application (without Admin console)


  1. Open a command prompt as follows: Click Start, click Run, type cmd, and then click OK.
  2. Type the following command, substituting the appropriate values, as described in the following table:

    BTSTask ExportBindings /Destination:value [/ApplicationName:value] [/GlobalParties] [/Server:value] [/Database:value]

    Example:

    BTSTask ExportBindings /Destination:"C:\Binding Files\MyBindings.xml" /ApplicationName:MyApplication /Server:MyDatabaseServer /Database:BizTalkMgmtDb


    Parameter Value:

    /Destination
    Full path of the binding file to create, including the file name. If a binding file having the same path already exists, it is overwritten. If there are spaces in the path, you must enclose it in double quotation marks (").
    /ApplicationName
    Name of the application from which to export bindings. The application must exist. To verify the application name, you can use the ListApps command, as described in ListApps Command. If this parameter is not specified, the default BizTalk application is used. If there are spaces in the name, you must enclose it in double quotation marks (").
    /GlobalParties
    When specified, exports global party information for the group.
    /Server
    Name of the SQL Server instance hosting the BizTalk Management database, in the form ServerName\InstanceName,Port.
    Instance name is only required when the instance name is different than the server name. Port is only required when SQL Server uses a port number other than the default (1433).
    Examples:
    Server=MyServer
    Server=MyServer\MySQLServer,1533
    If not provided, the name of the SQL Server instance running on the local computer is used.
    /Database
    Name of the BizTalk Management database. If not specified, the BizTalk Management database running in the local instance of SQL Server is used.

giovedì 15 settembre 2011

Resize/extend virtual hard disk get more space under Windows 7


Steps to create virtual hard disk in Windows 7:
1. Open Disk Management by typing disk management or right-click the Computer icon to select Manage.
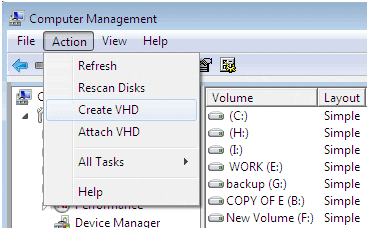
2. Click the Action button and select Create VHD.


Create VHD in Windows 7
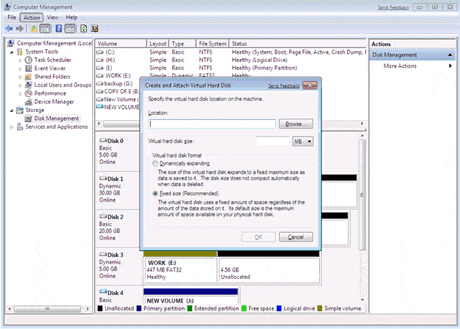
3. Select a folder location and type in a disk size.


Create virtual hard disk
4. Click OK to finish.
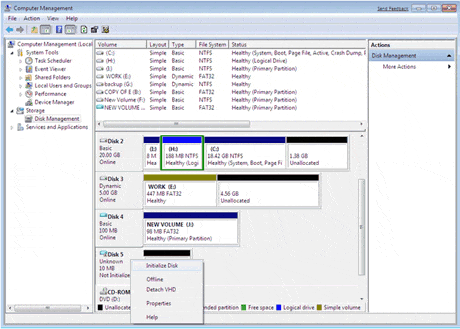
5. After it is initialized, you can create partition on it.
Initialize VHD

Resize VHD with built-in Disk Management tool in Windows 7
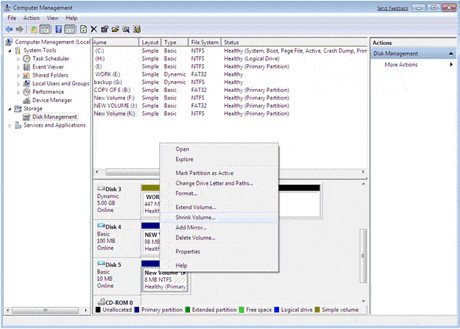
Windows 7 contains a built-in partition manager that allows you to extend or shrink the attached virtual disk which is the same as the physical disks.
Resize virtual disk volume in Disk Management tool

giovedì 1 settembre 2011

"The network BIOS command limit has been reached" error message in Windows Server 2003, in Windows XP, and in Windows 2000 Server

CAUSE:
This issue may occur if the following conditions are true:
  • This issue may occur if the client computer submits simultaneous, long-term requests against a file server that uses the Server Message Block (SMB) protocol. An example of a long-term request is when a client computer uses the FindFirstChangeNotification function to monitor a server share for changes.
  • This issue may occur if the MaxCmds registry value setting on the client is less than 50, or the MaxMpxCtregistry value setting on the server is less than 50.

    Note The MaxMpxCt registry value setting may have a different name on other SMB/CIFS implementations. The Common Internet File System (CIFS) specification refers to it as MaxMpxCount.
RESOLUTION:
Important This section, method, or task contains steps that tell you how to modify the registry. However, serious problems might occur if you modify the registry incorrectly. Therefore, make sure that you follow these steps carefully. For added protection, back up the registry before you modify it. Then, you can restore the registry if a problem occurs. For more information about how to back up and restore the registry, click the following article number to view the article in the Microsoft Knowledge Base:
322756  How to back up and restore the registry in Windows


To resolve this issue, verify that the MaxCmds and MaxMpxCt registry values are set to 50 or more. To do this, follow these steps:
  1. Click Start, click Run, type regedit, and then click OK.
  2. Locate and then click the following key in the registry:
    HKEY_LOCAL_MACHINE\SYSTEM\CurrentControlSet\Services\lanmanworkstation\parameters
  3. In the right pane, double-click the MaxCmds value.
  4. In the Value data box, verify that the value is 50 or more.

    Note In a Microsoft Windows Terminal Services environment, you may have to set the MaxCmds registry value to 500 or more. For more information, click the following article number to view the article in the Microsoft Knowledge Base:
    232476  Terminal Server client connections and logon limited by MaxWorkItem and MaxMpxCt values
  5. Locate and then click the following key in the registry:
    HKEY_LOCAL_MACHINE\SYSTEM\CurrentControlSet\Services\lanmanserver\parameters
    Note Make sure that you make this change to the lanmanserver\parameters registry key and not to thelanmanworkstation\parameters registry key mentioned in step 2.
  6. In the right-pane, double-click the MaxMpxCt value.

    Note On SMB servers that are running a version of Windows earlier than Windows 2000, the MaxMpxCt registry entry is named MaxMpxCount, but has the same function.
  7. In the Value data box, verify that the value is 50 or more. 

    Note The MaxMpxCt value determines the maximum number of simultaneous, active requests that the server permits from an individual client.
  8. Quit Registry Editor.
  9. Restart the server.
Note The MaxCmds and MaxMpxCt registry entries are REG_DWORD decimal entries. If they do not exist on your computer, you can create them as new REG_DWORD values. The range of values for these registry entries is between 0 and 65535.

MORE: 
The maximum number of simultaneous, active requests between an SMB client and the server is determined when a client/server session is negotiated. The maximum number of requests that a client supports is determined by theMaxCmds registry value. The maximum number of requests that a server supports is determined by the MaxMpxCtregistry value. For a particular client and server pair, the number of simultaneous, active requests is the lesser of these two values.

In a BizTalk environment, add both registry values to the BizTalk server and the remote UNC Share server. 

To track the number of simultaneous, active requests on an SMB client, add the Current Commands counter in the SMB Redirector performance object to Performance Monitor.